Data layers are pivotal in modern web development and digital marketing strategies, enabling organizations to gain valuable insights into user behavior and interactions. In Adobe Experience Manager, setting up and utilizing Data Layers empowers marketers and developers to optimize experiences, personalize content, and drive better outcomes. By understanding the fundamentals of Data Layers and leveraging them effectively, businesses can stay ahead in today’s competitive digital landscape.
Tools like Adobe Experience Manager (AEM) have powerful features, including the Datalayer, to effectively capture and utilize this data. In this article, we’ll delve into what data layers are, why they are crucial for your AEM projects, how to set them up within AEM, and how to inspect them on the front end.
What are Data layers?
Data layers are structured data formats that encapsulate valuable information about user interactions, page metadata, and other relevant details on a website. Think of them as containers containing critical information about a user’s journey and activities on a web page. Various analytics and marketing tools then utilize this data to gain insights, personalize experiences, and optimize strategies.
Why are Data layers used?
They offer several advantages:
- Consolidated Data: Datalayers aggregate diverse data points into a single format, making managing and analyzing user interactions across different platforms and tools easier.
- Real-time Insights: By capturing data in real-time, Data Layers provide immediate insights into user behavior, allowing marketers and developers to make informed decisions promptly.
- Enhanced Personalization: With rich user data, marketers can create more targeted and personalized experiences for their audience, leading to higher engagement and conversion rates.
- Integration Flexibility: Data layers can seamlessly integrate with various analytics and marketing platforms, enabling comprehensive data analysis and campaign optimization.
Setting up Data layers in Adobe Experience Manager
In Adobe Experience Manager, configuring Datalayers involves a few steps:
- Identify Key Data Points: Determine which information you want to capture in your Datalayer, such as page URL, user actions, custom events, etc.
- Implement Datalayer Variables: Define variables within your AEM components or templates to store the relevant data. These variables will populate the Datalayer with the desired information.
- Trigger Datalayer Events: Use JavaScript or AEM’s built-in capabilities to trigger Datalayer events based on user interactions, page loads, or predefined actions.
- Test and Validate: Ensure the Datalayer implementation functions correctly by testing it across different scenarios and validating the captured data.

Step-by-step configuration:
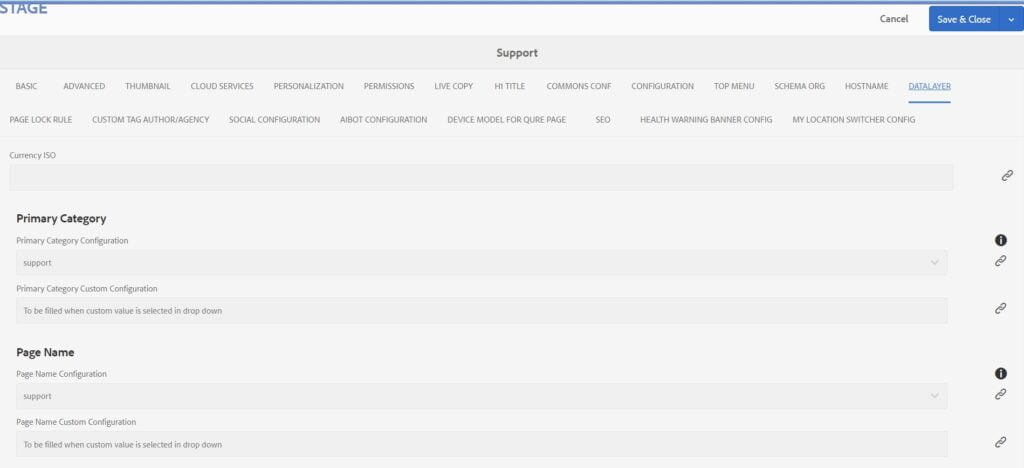
Here is how we configure it at our company (check the image above):
- Open the editor of the page for which you want to add data layers.
- Navigate to Open Properties.
- In the properties, you should find the Datalayer tab.
- You should find the fields that need to be filled out inside. In our case, we are adding the Primary Category and Page Name data layers.
- Save the changes and publish the page.
Inspecting Data layers manually in Page Source
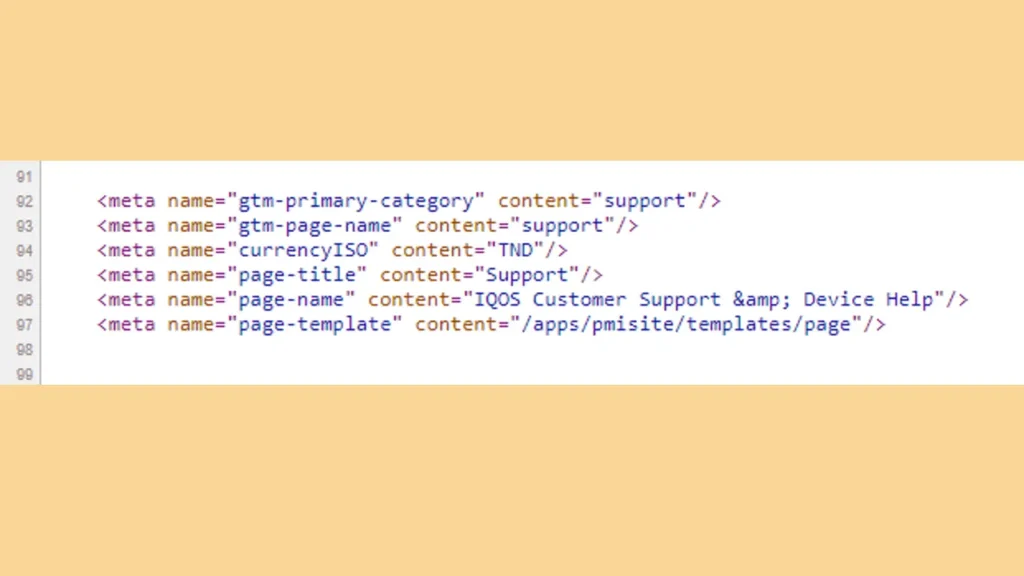
You may check the data layers set on the page by opening the page source. So, when you are on the page you want to test, right-click on the empty space on the page, click View Page Source, or press Ctrl + U.

After you’ve opened the page source, you should find the set data layer labels. In our case those are the following:
- gtm-primary-category
- gtm-page-name
In order to find them easier, you should use the find option (Ctrl + F). If the content added for them matches with the expected results, then you may confirm that the data layers are successfully set for the page.

Inspecting Datalayers in the Frontend with DevTools
Once Data layers are implemented, you can inspect them in the front end using browser developer tools:
- Open Developer Tools: Right-click on any webpage element, select “Inspect,” or press F12 to open the developer tools panel.
- Navigate to Console or Network Tab: Depending on the browser, navigate to either the “Console” or “Network” tab within the developer tools.
- Search for Datalayer Objects: In the console or network tab, search for objects named “datalayer” or similar. These objects contain the structured data captured by the Data layer.
- Review Data Attributes: Expand the Datalayer objects to review the data attributes and values stored within them. Verify that the expected information is being captured accurately.
By inspecting the Datalayers in the front, you can validate the implementation and ensure the necessary data is captured as intended.


