I will walk you through a test I set up in Postman for a PUT request. This was a fun and educational process, so I’m sharing the details to help beginners understand how to make dynamic requests and validate responses in Postman. If you’re new to API testing, don’t worry—I’ll explain everything step by step.
The API Request
Let’s start with the API I was working with. It’s a PUT request that updates an interest group for an ad system. The request body looks like this:
{
    "interestGroups": [
        {
            "adSizes": {},
            "ads": [],
            "biddingLogicUrl": "https://at-us-east.amazon-adsystem.com/biddingLogic/bidder_v2.js",
            "name": "293ceb3f-105f-4465-9abd-09ac915162c6",
            "owner": "https://at-us-east.amazon-adsystem.com/",
            "sizeGroups": {},
            "trustedBiddingSignalsKeys": [
                "adId"
            ],
            "trustedBiddingSignalsUrl": "https://at-us-east.amazon-adsystem.com/biddingSignals/cs",
            "updateUrl": "https://at-us-east.amazon-adsystem.com/interestGroup/update?ig_name=293ceb3f-105f-4465-9abd-09ac915162c6&label=C-A1JSFF43SRWGQ6&m=1",
            "userBiddingSignals": {}
        }
    ]
}
This body includes information about the interest group, like the bidding logic URL, owner, and update URL. It also contains some arrays and objects that were empty in this case (adSizes, ads, and userBiddingSignals), but the key point is that these fields define a lot about how an interest group operates.
Making the Request Dynamic
One challenge with hardcoding the request like this is that it’s not reusable if I want to change the values of certain fields. For example, if I want to change the interest group name or the URLs, I’d have to manually update each one in the body. That’s not very efficient.
To solve this, I used environment variables in Postman. These variables allow me to define values that can be used dynamically throughout the request, and they’re great for managing multiple scenarios or testing different data sets.
Here’s how I set them up:
Pre-request Script
pm.environment.set("interestGroupName", "293ceb3f-105f-4465-9abd-09ac915162c6");

pm.environment.set("biddingLogicUrl", "https://at-us-east.amazon-adsystem.com/biddingLogic/bidder_v2.js");

pm.environment.set("owner", "https://at-us-east.amazon-adsystem.com/");

pm.environment.set("trustedBiddingSignalsUrl", "https://at-us-east.amazon-adsystem.com/biddingSignals/cs");

pm.environment.set("updateUrl", "https://at-us-east.amazon-adsystem.com/interestGroup/update?ig_name={{interestGroupName}}&label=C-A1JSFF43SRWGQ6&m=1");
With this script, I’m storing the key values like the interest group name, bidding logic URL, owner, and trusted bidding signals URL in environment variables. This way, when the request runs, it grabs the values from these variables instead of having static data in the request body.
The Dynamic Request Body
Once I set the variables, I updated the request body to reference these variables:
{
    "interestGroups": [
        {
            "adSizes": {},
            "ads": [],
            "biddingLogicUrl": "{{biddingLogicUrl}}",
            "name": "{{interestGroupName}}",
            "owner": "{{owner}}",
            "sizeGroups": {},
            "trustedBiddingSignalsKeys": [
                "adId"
            ],
            "trustedBiddingSignalsUrl": "{{trustedBiddingSignalsUrl}}",
            "updateUrl": "{{updateUrl}}",
            "userBiddingSignals": {}
        }
    ]
}
Notice how the fields that were static before are now wrapped in double curly braces ({{}}). This is Postman’s syntax for referencing variables. When the request runs, Postman replaces these placeholders with the actual values from the environment variables.
Validating the Response
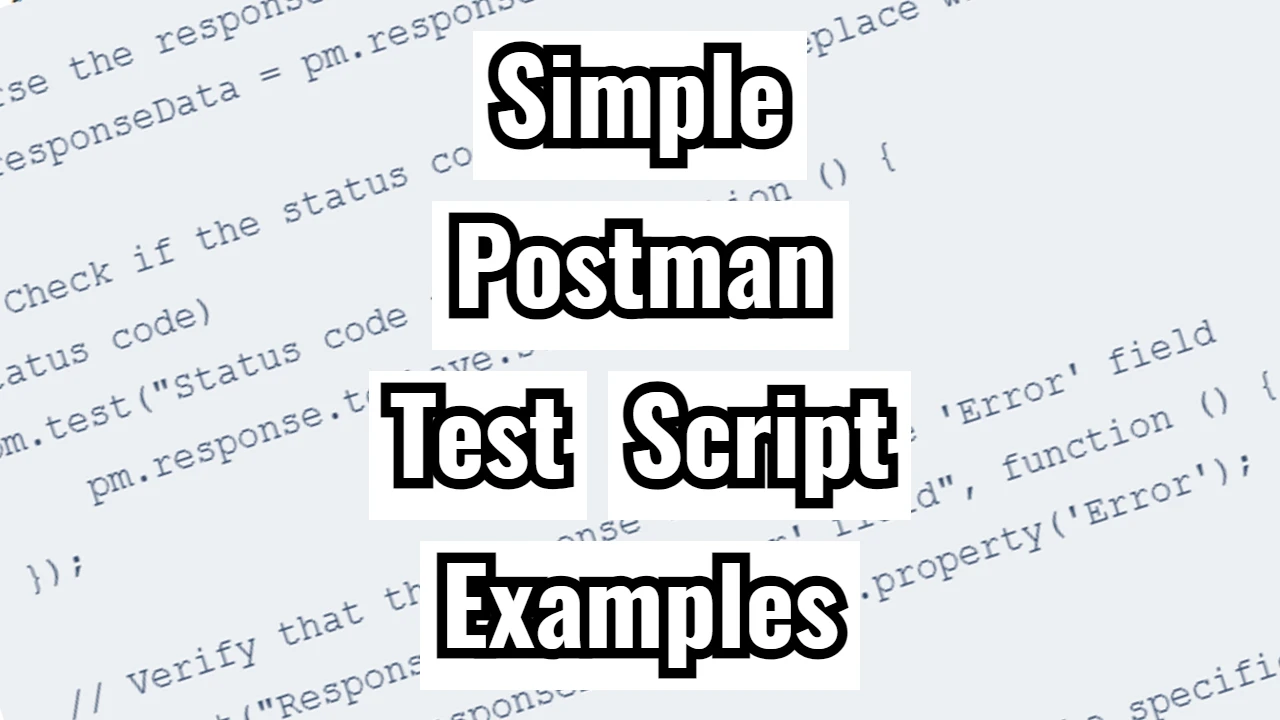
The next step was to verify that the API was doing what I expected. After all, it’s important to check that the update happened correctly. I wrote a Test script to run after the request, validating the server’s response.
Here’s the script I used:
// Test if the response code is 200
pm.test("Status code is 200", function () {
    pm.response.to.have.status(200);
});

// Parse response
var jsonData = pm.response.json();

// Check if interestGroups is returned in response
pm.test("Interest group is present in the response", function () {
    pm.expect(jsonData.interestGroups).to.be.an("array").that.is.not.empty;
});

// Validate the interest group details
pm.test("Interest group details are correct", function () {
    const interestGroup = jsonData.interestGroups[0];
    pm.expect(interestGroup.name).to.equal(pm.environment.get("interestGroupName"));
    pm.expect(interestGroup.biddingLogicUrl).to.equal(pm.environment.get("biddingLogicUrl"));
    pm.expect(interestGroup.owner).to.equal(pm.environment.get("owner"));
    pm.expect(interestGroup.trustedBiddingSignalsUrl).to.equal(pm.environment.get("trustedBiddingSignalsUrl"));
});

// Additional test: Check if response has valid structure for keys
pm.test("Trusted bidding signals keys contains adId", function () {
    const keys = jsonData.interestGroups[0].trustedBiddingSignalsKeys;
    pm.expect(keys).to.include("adId");
});
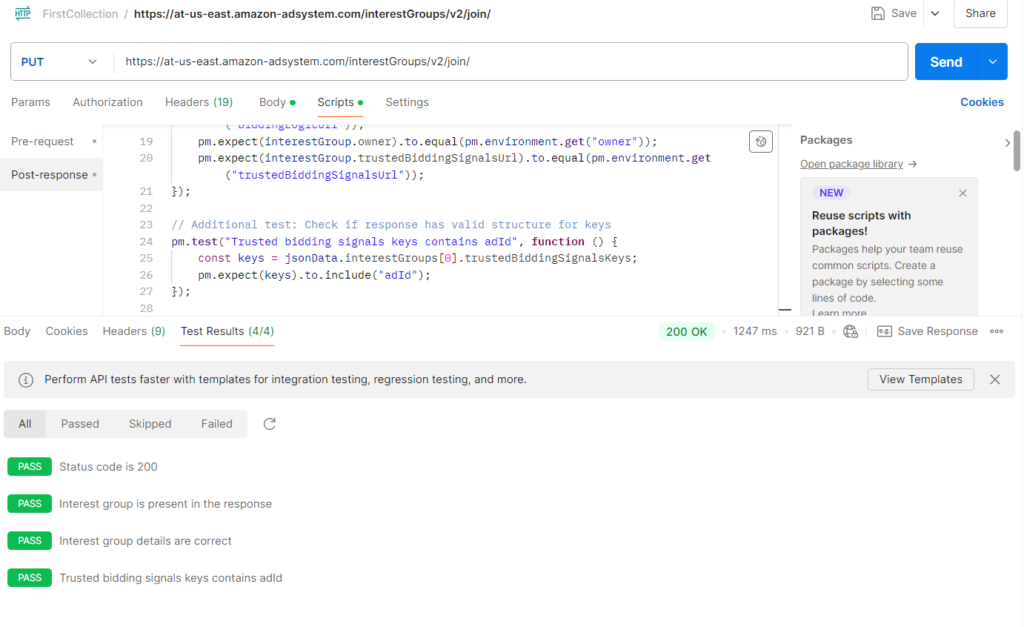
Let’s break this down:
- Status Code Test: The first test checks if the response status code is
200, which indicates the request was successful. - Parsing the Response: I then parse the response as JSON, so I can access the data inside.
- Interest Group Check: I check if the response contains the
interestGroupsarray, and I confirm that it’s not empty. - Validating Data: Next, I verify that the details in the response (like the interest group name, bidding logic URL, and owner) match the values I sent in the request. I use the environment variables to cross-check these values.
- Key Validation: Finally, I confirm that the
trustedBiddingSignalsKeysarray includes the valueadId, as expected.
Conclusion
With this setup, I can quickly test various interest group configurations without having to update the request each time manually. Thanks to the tests that validate both the structure and the data in the response, I have full confidence that the API is working correctly.