Today, I’m excited to walk you through a simple but effective web-based console simulator app I created, which helps beginners and enthusiasts execute and visualize JavaScript code output without using an integrated development environment (IDE). This guide will explain how the app works, with a detailed breakdown of the JavaScript code so that even beginners can grasp the concepts behind it.
You may check out the full source code here: https://github.com/NoToolsNoCraft/Console.log-Test-Apps/blob/main/Console.log%20Simulator/ConsoleLogSimulator.html
Overview of the Console Simulator App
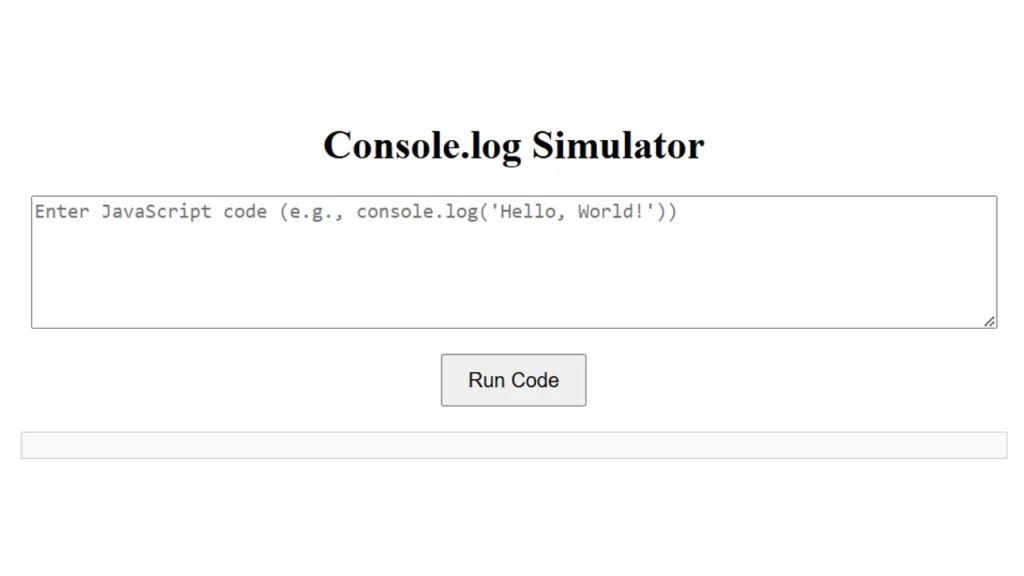
The console simulator app is a simple HTML, CSS, and JavaScript-based tool where users can write JavaScript code in a text area, run it, and see the output directly on the web page. This app simulates the behavior of the console.log() function, allowing learners to test snippets of JavaScript code and understand how the console object works in practice.
App Features:
- Input field for writing JavaScript code.
- Button to execute the code.
- Display area to show the output or errors from the code execution.
Detailed Explanation of the Code
The HTML Structure
Here’s the HTML that defines the structure of our console simulator:
<!DOCTYPE html>
<html lang="en">
<head>
    <meta charset="UTF-8">
    <meta http-equiv="X-UA-Compatible" content="IE=edge">
    <meta name="viewport" content="width=device-width, initial-scale=1.0">
    <title>Console Simulator</title>
    <style>
        body {
            font-family: Arial, sans-serif;
            display: flex;
            flex-direction: column;
            align-items: center;
            margin-top: 50px;
        }
        textarea {
            width: 50%;
            height: 100px;
            margin-bottom: 20px;
            font-size: 16px;
        }
        button {
            padding: 10px 20px;
            font-size: 16px;
            cursor: pointer;
        }
        .output {
            margin-top: 20px;
            width: 50%;
            border: 1px solid #ccc;
            padding: 10px;
            background-color: #f9f9f9;
            white-space: pre-wrap;
            overflow: auto;
        }
    </style>
</head>
<body>
    <h1>Console Simulator</h1>
    <textarea id="codeInput" placeholder="Enter JavaScript code (e.g., console.log('Hello, World!'))"></textarea>
    <button onclick="runCode()">Run Code</button>
    <div id="output" class="output"></div>
</body>
</html>
Breakdown of the HTML:
<textarea>: Provides a text input field where users can write JavaScript code.<button>: Triggers the function to execute the code when clicked.<div>: Acts as an output container to display the results or any errors.
The JavaScript Code
Below is the JavaScript that powers the functionality of the app:
<script>
    function runCode() {
        const codeInput = document.getElementById('codeInput').value;
        const outputDiv = document.getElementById('output');
        outputDiv.innerHTML = ''; // Clear previous output
        let outputGenerated = false;

        try {
            // Capture console.log output
            const consoleLog = console.log;
            console.log = function(...args) {
                outputGenerated = true;
                outputDiv.innerHTML += args.join(' ') + '\n';
                consoleLog.apply(console, args);
            };

            // Evaluate the user input
            eval(codeInput);

            // Check if no output was generated
            if (!outputGenerated) {
                outputDiv.innerHTML = 'Warning: No output was generated. Check if your code is correct or if it produces any output.';
            }

            // Restore original console.log
            console.log = consoleLog;
        } catch (error) {
            outputDiv.innerHTML = `Error: ${error.message}`;
        }
    }
</script>
Detailed Explanation:
- Fetching User Input:
const codeInput = document.getElementById('codeInput').value;- This line retrieves the code entered by the user in the
<textarea>element.
- Clearing Previous Output:
outputDiv.innerHTML = '';- Before displaying new results, the previous content in the
outputDivis cleared.
- Simulating
console.log():const consoleLog = console.log;- We first save the original
console.logmethod to a variable so we can restore it later. - We override
console.logwith a custom function that appends the output to theoutputDivand ensures thatconsoleLog.apply(console, args)is called to maintain native logging behavior in the browser console.
- Evaluating User Code:
eval(codeInput);- The
eval()function takes the user-provided code and executes it. Note: In real-world applications, be cautious when usingeval()as it can execute arbitrary code and potentially introduce security risks. In a controlled learning environment, it helps beginners experiment with JavaScript.
- Handling No Output Scenarios:
if (!outputGenerated) { ... }- This condition checks if
console.log()was called. If no output was generated, a warning message is displayed.
- Error Handling:
catch (error) { outputDiv.innerHTML = \Error: ${error.message}`; }`- If the user code contains errors, they are caught and displayed to inform the user.
- Restoring the Original
console.log:console.log = consoleLog;- After execution, the original
console.logmethod is restored to avoid affecting other JavaScript operations.
How It Works Step-by-Step
- The user types JavaScript code into the
<textarea>. - When the Run Code button is clicked, the
runCode()function is executed. - The function captures the input, evaluates the code, and displays
console.log()outputs in theoutputDiv. - If the code runs successfully, the output is shown. If there is an error or no output is generated, the app provides feedback accordingly.
Why This App Is Useful
This console simulator is a simple yet powerful learning tool for beginners. It allows users to:
- Experiment with JavaScript without needing a development environment.
- Understand how
console.log()works. - Troubleshoot and see real-time feedback.
By understanding how to build this app, beginners can enhance their JavaScript skills and gain confidence in their coding abilities.


