A table of contents (TOC) is a handy feature that helps organize and navigate lengthy documents or pages in Confluence. Whether you’re creating a project report, documentation, or a wiki page, a well-structured TOC can enhance readability and usability. In this guide, we’ll walk you through the straightforward process of creating a table of contents in Confluence.
The Importance of a Table of Contents
Let’s briefly understand why a table of contents is essential. A TOC serves as a roadmap for your content, allowing readers to quickly locate specific sections or topics within a document or page. It improves navigation, saves time, and enhances the overall user experience.
Step 1: Access the Page Editor
To begin, navigate to the Confluence page where you want to create the table of contents. To start a new page, click the “+” button at the top of the Confluence interface and select “Blank page” to open the editor. Click the “Edit” button at the top right corner to edit an existing page.

Transitioning to the TOC Insertion Point
Once you’re in the page editor, decide where to insert the table of contents. Typically, the TOC is placed at the beginning of the page, but you can position it wherever it makes the most sense for your content.
Step 2: Insert the Table of Contents Macro
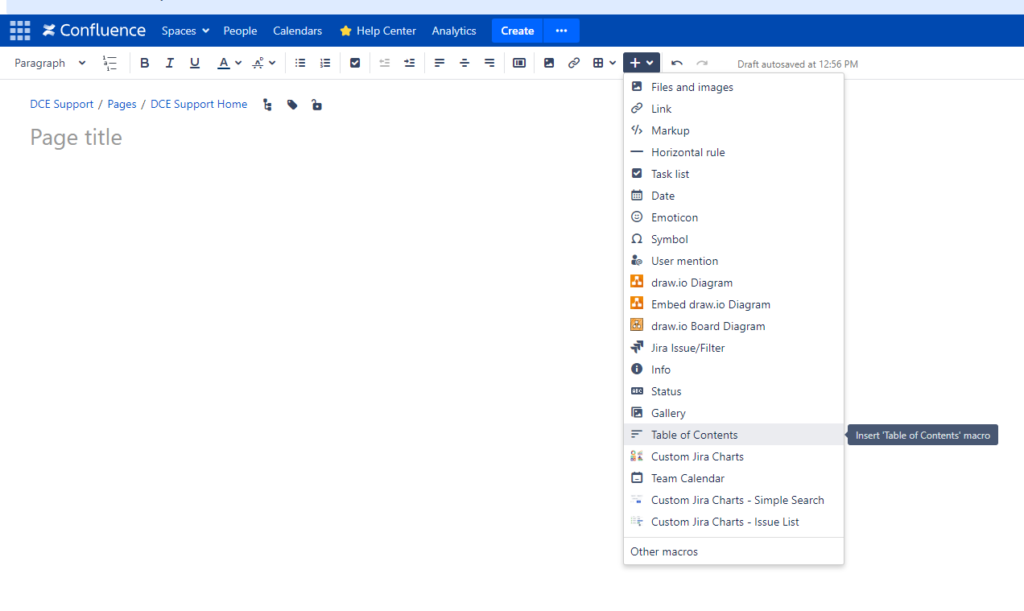
Locate the macro menu in the Confluence editor toolbar to insert the table of contents. It is represented by a puzzle piece icon. Click on the macro menu to open it, then type “Table of Contents” in the search bar. Select the “Table of Contents” macro from the dropdown list.

Step 3: Configure the Table of Contents Macro
After selecting the “Table of Contents” macro, Confluence will insert it into your page at the cursor position. The macro will display as {toc}. You can customize the appearance and behavior of the TOC by configuring the macro options.

Transitioning to Macro Options
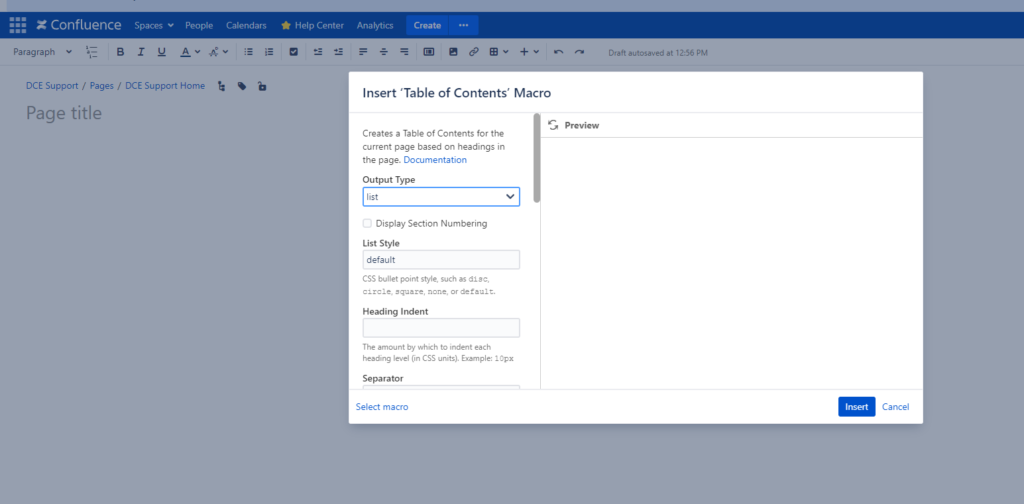
To access the macro options, click the “Edit” button next to the {toc} macro on your page. This will open the macro configuration dialog, where you can adjust various settings.
Step 4: Customize the Table of Contents
In the macro configuration dialog, you can customize the table of contents according to your preferences. Some standard customization options include:
- Depth: Specify how many heading levels to include in the TOC.
- Position: Choose whether to display the TOC above or below the content.
- Style: Select the style of the TOC, such as bullet points or numbered lists.
- Minimum Heading Level: Define the minimum heading level to include in the TOC.
Step 5: Save and Preview
Once you’ve configured the table of contents to your liking, click the “Save” button to apply the changes. You can then preview the page to see how it appears to users.
Best Practices for Creating a Table of Contents
- Use Descriptive Headings: To optimize the effectiveness of the TOC, ensure that your page content is well-structured with clear and descriptive headings.
- Regular Updates: If your content changes frequently, remember to update the table of contents accordingly to keep it accurate and current.
- Test on Different Devices: Check how the TOC renders on various devices and screen sizes to ensure a consistent user experience.
- Accessibility: When designing your TOC, consider accessibility guidelines to ensure it’s usable for all users, including those using assistive technologies.
Now you know How to Create a Table of Contents in Confluence
Creating a table of contents in Confluence is straightforward and can significantly improve the usability of your pages. By following the steps outlined in this guide and adhering to best practices, you can create well-organized and navigable content that enhances collaboration and productivity in your Confluence space. Whether you’re documenting processes, sharing knowledge, or producing project reports, a well-designed TOC is a valuable asset that benefits both creators and readers alike.


