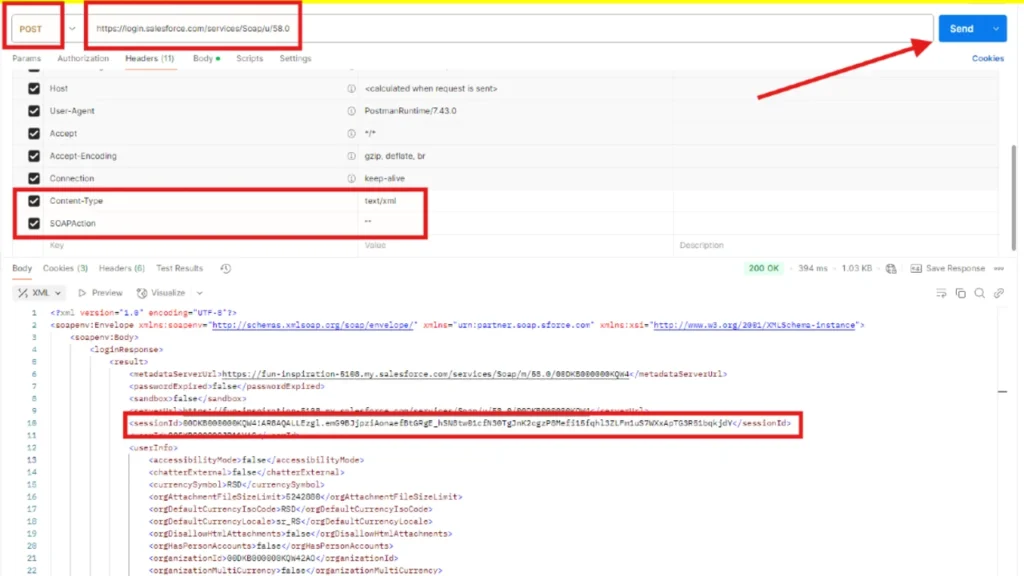
SOAP-based username-password login connects directly with Salesforce. This is a more straightforward but less secure method than OAuth, as it directly embeds credentials and security tokens in the code. SOAP connects directly via the jsforce library and not OAuth 2.0. That means there’s no client_id or client_secret involved in this case.
Basically, the credentials we need in this case are a Salesforce account Username, Password, and Token. Salesforce provides REST and SOAP APIs to access data without needing an intermediary app. You can test and manipulate data directly using tools like Postman, which is quick and efficient.
Steps to Add Salesforce Authorization to Postman
1. Identify the Salesforce Endpoint
Since your app uses the jsforce.Connection method, the loginUrl in your code determines the endpoint:
- Production:
https://login.salesforce.com - Sandbox:
https://test.salesforce.com
2. Create the Authorization Request in Postman
You’ll simulate the conn.login() method from your app, which sends the username and password+securityToken directly to Salesforce.
- Create a New Request in Postman:
- Method:
POST - URL:
https://login.salesforce.com/services/Soap/u/58.0- Replace
58.0with your Salesforce API version if needed (you can check the version your Salesforce instance supports).
- Replace
- Method:
- Set the Request Headers: Add these key-value pairs in the Headers tab:
Content-Type: text/xmlSOAPAction: "" - Add the SOAP Body: In the Body tab, select raw, and set the type to XML. Use this template to define the login request:
<?xml version="1.0" encoding="utf-8" ?><env:Envelope xmlns:xsd="http://www.w3.org/2001/XMLSchema" xmlns:xsi="http://www.w3.org/2001/XMLSchema-instance" xmlns:env="http://schemas.xmlsoap.org/soap/envelope/"> <env:Body> <n1:login xmlns:n1="urn:partner.soap.sforce.com"> <n1:username>ADD YOUR SALESFORCE USERNAME HERE</n1:username> <n1:password>PASSWORD+TOKEN HERE</n1:password> </n1:login> </env:Body> </env:Envelope>
3. Send the Request
Click Send in Postman. If successful, Salesforce will respond with a session token in the SOAP response. Look for something like this:
<sessionId>00DXXXXXXXXXXXX!XXXXXXXXXXXXXXXXXXXXXXXXXXXXXXXXX</sessionId>Copy this sessionId value. You’ll use it as your access token for further API requests. The goal of this first request is to get the sessionId.
The whole SOAP response will look something like this:
<?xml version="1.0" encoding="UTF-8"?>
<soapenv:Envelope xmlns:soapenv="http://schemas.xmlsoap.org/soap/envelope/" xmlns="urn:partner.soap.sforce.com" xmlns:xsi="http://www.w3.org/2001/XMLSchema-instance">
    <soapenv:Body>
        <loginResponse>
            <result>
                <metadataServerUrl>https://fun-inspiration-5108.my.salesforce.com/services/Soap/m/58.0/00DKB000000KQW4</metadataServerUrl>
                <passwordExpired>false</passwordExpired>
                <sandbox>false</sandbox>
                <serverUrl>https://fun-inspiration-5108.my.salesforce.com/services/Soap/u/58.0/00DKB000000KQW4</serverUrl>
                <sessionId>00DKB000000KQW4!AR8AQALLEzgl.emG9BJjpziAonaefBtGRgE_hSN8tw01cfN30TgJnK2cgzP8Mefi15fqhl3ZLFm1uS7WXxApTG3R51bqkjdY</sessionId>
                <userId>005KB000000JP11YAG</userId>
                <userInfo>
                    <accessibilityMode>false</accessibilityMode>
                    <chatterExternal>false</chatterExternal>
                    <currencySymbol>RSD</currencySymbol>
                    <orgAttachmentFileSizeLimit>5242880</orgAttachmentFileSizeLimit>
                    <orgDefaultCurrencyIsoCode>RSD</orgDefaultCurrencyIsoCode>
                    <orgDefaultCurrencyLocale>sr_RS</orgDefaultCurrencyLocale>
                    <orgDisallowHtmlAttachments>false</orgDisallowHtmlAttachments>
                    <orgHasPersonAccounts>false</orgHasPersonAccounts>
                    <organizationId>00DKB000000KQW42AO</organizationId>
                    <organizationMultiCurrency>false</organizationMultiCurrency>
                    <organizationName>Petar Skrbic</organizationName>
                    <profileId>00eKB000001H75cYAC</profileId>
                    <roleId xsi:nil="true"/>
                    <sessionSecondsValid>7200</sessionSecondsValid>
                    <userDefaultCurrencyIsoCode xsi:nil="true"/>
                    <userEmail>[email protected]</userEmail>
                    <userFullName>Petar Skrbic</userFullName>
                    <userId>005KB000000JP11YAG</userId>
                    <userLanguage>en_US</userLanguage>
                    <userLocale>sr_RS</userLocale>
                    <userName>[email protected]</userName>
                    <userTimeZone>Europe/Belgrade</userTimeZone>
                    <userType>Standard</userType>
                    <userUiSkin>Theme3</userUiSkin>
                </userInfo>
            </result>
        </loginResponse>
    </soapenv:Body>
</soapenv:Envelope>
This sessionId is valid for 2 hours (as indicated by <sessionSecondsValid>7200</sessionSecondsValid>).
4. Use the Session ID in Subsequent API Requests
Now that you have the session ID, you can use it to make REST API requests to Salesforce.
- Create a New Request:
- Method:
GET - URL:
https://yourInstance.salesforce.com/services/data/v58.0/sobjects/Contact- Replace
yourInstancewith your Salesforce instance (e.g.,na1,eu2, etc.). - Replace
v58.0with the same version you used earlier.
Here is an example of a URL I’ve recently used:
https://fun-inspiration-5108.my.salesforce.com/services/data/v58.0/sobjects/Contact
- Replace
- Method:
- Set the Authorization Header: In the Headers tab, add:
Authorization: Bearer <sessionId>
Replace<sessionId>with the value you generated and copied from the previous step. - Send the Request: Click Send to retrieve the
Contactdata, or other data you wish
After you send the request, you should receive a response with all Contact records from your Salesforce organization.

Test Other Endpoints
You can now interact with other Salesforce objects by changing the sobjects/Contact in the URL to something else, like:
sobjects/Accountsobjects/Opportunity


